| |
August 2004 - Vol 6, No.
4 |
Products and Services
Cruiser Kick-Out Pegs from
BikerBrackets.com
By Brad
Connatser, ISRA #14726
Introduction
When I anticipate a long haul on my
V-Star 1100 Classic, I tend to focus my worries on, well, my ass.
When I ride for more than an hour, I get the dreaded dead-butt condition.
But recently I drove my bike for 700 miles and experienced a different
kind of pain--knee pain. Both knees were sore and painful to the
touch by the time I cruised into my garage. Sure, a little Advil
and I was fine, but wouldn't it be better to prevent the pain? For
my tooshie pain, I bought an AirHawk seat cushion, which works well
to lift my dead zone off the tractor seat. To prevent knee pain,
I would need some pegs so that I could stretch my legs during long
hauls.
At first, I considered simple pegs
that would attach to the frame somehow. My brother, who also owns
a V-Star 1100 Classic, did just that. But my legs are exceptionally
short for my 5'10" frame, and there was no way that I my legs
could reach highway pegs.
Then I saw Floorboard Cruisin' Pegs
from Aeromach at:
http://www.aeromach.net/cat_pg2.html?
But at $188.95 per pair, I needed to
make sure that they worked. So I posted a message on the ISRA forum.
Yes, the conclusion was that they worked, but Jeff Leitner, owner
of BikerBrackets.com, reported that
his company had designed pegs that attach under the floorboards
and retract so that they are hardly noticeable.
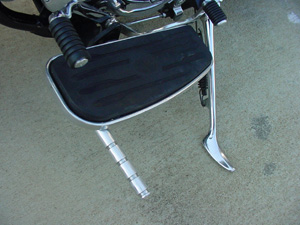
The Cruiser Kick-Out Pegs as Marketed by BikerBrackets.com
The Cruiser Kick-Out Pegs (order number
CKOP) cost $65.00 per pair. They fit the Yamaha Road Star, V-Star
1100 (Classic and Custom), V-Star 650 (Classic and Custom), and
Virago motorcycles with footrest style plates or floorboards. I
decided that the design and price were right, so I ordered a pair
through BikerBrackets.com's easy online ordering system. This article
evaluates the purchase and the product, including shipping and packaging,
quality of parts, installation instructions, installation, fit,
and performance.
Shipping and Packaging
I ordered the pegs on a Friday, and
within a week I received a small but heavy package. The items within
were carefully and individually packaged in bubble wrap, preventing
the parts from rubbing against each other during the motion of shipping.
All parts that are specified in the instructions were present.
Quality of Parts
Each peg assembly has seven pieces:
two common washers, one fender washer, two bolts, one threaded stop
post, and one peg. The pegs are composed of 6061 polished billet
aluminum. They are machine tooled with wide grooves that present
a slip-resistant surface. All parts were in excellent shape.
Installation Instructions
Because the installation is quite simple,
the installation instructions easily fit on one sheet of paper (front
and back). The instructions include nine steps per peg and four
large photographs, three of which are referenced in the words of
instruction. The instructions are clear except for the identification
of the washers, which come in two sizes. Nevertheless, this ambiguity
was easily resolved after a quick inspection of the third photograph,
which shows the placement of the large fender washer. Finally, the
instructions include a temple for drilling, which makes installation
a snap.
Installation
The BikerBrackets.com Web site promises
a 10-minute installation, and indeed the installation can be completed
in that time. Of course, gathering the tools for the installation
expands the project duration to about 15 minutes, and the occasional
beer break my expand it to 20 minutes. Generally, the installation
went smoothly. The scope of the installation is not intimidating--simply
drill two holes in the floorboard metal. Two bolts are then placed
into these holes, one for the pivot of the peg and another for the
stop post. The rest of the hardware mounts under the floorboard.
A few turns of the wrench, and the pegs are installed.
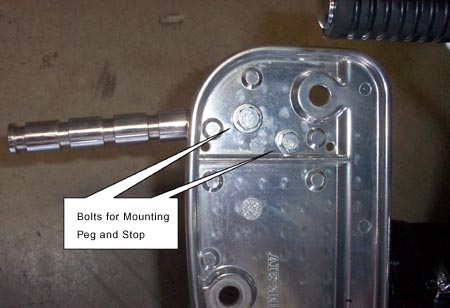
Two Bolts in Holes in the Floorboard Required for Installation
Fit
The Cruiser Kick-Out Pegs fit nicely
under the floorboards. They are hardly noticeable at normal eye
level at a few yards from the bike. They are not noticeable at all
when standing next to the bike. The pegs are designed to pivot from
a retracted position to a fully deployed position about 90 degrees
from the side of the floorboard. The pegs do not flop or vibrate
because of the clamping force between the pivot bolt/washer and
the nylon lock-nut assembly. This nylon lock nut is adjusted just
loose enough to enable the user to easily deploy the pegs and just
tight enough to prevent the peg from swinging out while using the
floorboards.

Cruiser Kick-Out Peg Retracted under Floorboard
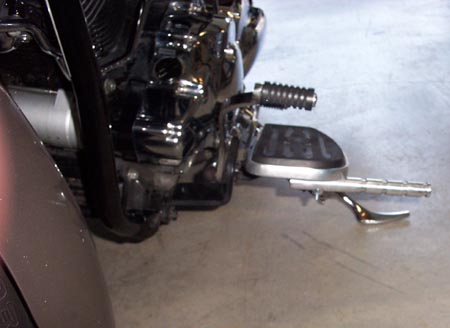
Cruiser Kick-Out Peg Deployed
Performance
One concern I had about pegs that mount
on the floorboards was clearance during turns. "I like the
idea of the pegs completely folding under the floorboard. However,
I wonder about road clearance," I posted on July 15, 2004.
Jeff Leitner assured me that the back of the floorboard is the part
that scrapes when going around tight turns. Indeed, when stashed
under the floorboards, they don't exacerbate scraping at all. However,
when fully deployed, they do scrape before the floorboards do. Of
course, if you are negotiating twisties, then you should not have
the pegs deployed anyway. Therefore, scraping is a non-issue with
these pegs.
Deploying the pegs is simple. As Jeff
Leitner says on his Web site: "There are two ways to deploy
the Pegs. One method, you can just slip your foot under the end
of the peg and tip it out. Another method is to reach down and simply
pull them out. Naturally it's safest to deploy the pegs while the
bike is stopped. Once initially flipped out, you can set them by
just pushing them the rest of the way out with your foot."
I could not deploy my pegs with my foot. I had to do it by hand,
which means that you have to stop before you use the pegs.
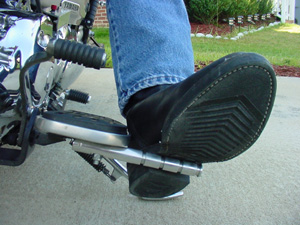
The Cruiser Kick-Out Pegs in Use
Once deployed, the pegs offered a perfect
perch for my booted feet. At first I did have the sensation that
my foot was slipping off, but it did not slip in the slightest.
I was able to fully extend both legs. I weigh in at 250 pounds,
and the pegs held up to my beefy legs. A normally proportioned individually
may not be able to get a full extension without moving back into
the seat, but as short as my legs are, I was able to sit normally
on the seat.
Conclusion
For the shape of my body--average height,
short legs--the Cruiser Kick-Out Pegs are ideal. They operated perfectly
during my trial ride, and therefore I highly recommend them. Taller
people may not be able to get a full extension, but will be able
to get some relief from the ninety-degree bend of the knees when
feet are placed on the stock floorboards. As Jeff Leitner said,
"I think the overall placement of the pegs and how comfortable
they are depends on your inseam and the style of seat you have." |