| |
December 2003 - Vol 5, No.
2 |
A Royal
Dilemma: Replace It or Rebuild It?
By Stephen
Fishman, ISRA #1948
It Happens....
I've been riding motorcycles since I was 14 years old. Now, almost
40 years later, I can count on one hand the number of mishaps. During
nearly four decades of riding, there was only an occasional near
miss until, a year ago, I bounced off a curb and dumped the bike
on an unmarked 90-degree curve. The good news was that I was only
doing 25 mph at the time and walked away from the incident; the
bad news was that my scoot was nearly totaled.
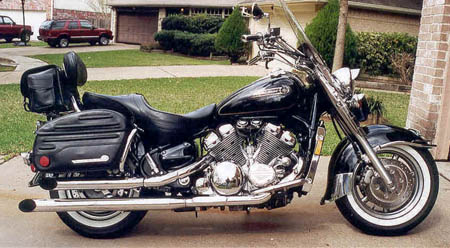
"Jake" Before the Accident
Decisions, Decisions
Do I sell the carcass for what I can get? Do I make minimal repairs,
sell the bike at a fire sale price and buy something else? Do I
rebuild it into something special?
I bought the black 1996 Yamaha Royal
Star second-hand in 1998 with about 8,000 miles on the odometer
and, during the next two years, added another 30,000 miles. "Jake"
is my primary commute vehicle, and we had seen thousands of miles
of back roads together. While wrangling with the insurance company
for several weeks, I vacillated about which route to take. Finally,
I decided to rebuild, for one simple reason--the Royal Star was
the best ride I had ever owned.
To Wrench or Not to Wrench
My local Yamaha dealer has a cracker-jack service department, so
I had them do some initial work just to make the bike road-worthy.
I wanted to ride the bike home instead of paying another towing
fee, even if it meant the dealer made some repairs thatI could have
easily done myself. It was a matter of expediency to have them replace
the handlebars, risers, and clutch master cylinder, but the rest
could wait till I got it home.
I do as much maintenance as possible
within a few self-imposed limitations. Whether or not to tackle
a repair is a simple decision. I check the shop manual to determine
the complexity of the repair and discover if special tools are needed.
I will dive in to just about anything, excluding the inside of the
engine and transmission.
Over the years, I have assembled a
fair assortment of tools along with a hydraulic floor jack, so I
can accomplish most tasks with relative ease. That said, it is my
expectation when going into any bike project that it will take me
approximately 1-1/2 times longer to make the repair than it would
the dealer, and I figure I'm ahead of the game if I finish a project
anywhere inside of this time frame.
Parts Is Parts
The plan was simple: Ride the bike as is and accumulate replacement
parts in preparation for the long Labor Day weekend in September.
Because the wreck happened in January and it was now February, I
had seven months to locate the parts and contract with a painter.
The project began with an inventory.
I carry extra insurance coverage for chrome and leather accessories,
and becausee most of the accessories were damaged, there was a sizable
settlement.
All accessories were stripped off with
OEM fittings in one pile, Yamaha accessories in another, and aftermarket
parts in a third. Jake carried a lot of chrome goodies at the time
of the "incident," but many of them, such as the front
fender rail, would not be replaced.
The parts that were in good shape but
would not be used in the rebuild were offered for sale on the motorcycle
club forums and Ebay. I'm not much of a packrat, so I focused on
getting the parts out of my garage and into someone else's. I planned
to keep or replace a lot of stuff, but, ultimately, I managed to
sell almost all of the parts from all three piles.
When we went off the road, we landed
in deep, soft turf, so there was almost no road rash. I straightened
the saddlebag guards and interior frames of the hard leather bags.
The rear fender was damaged, but the sub-frame was straightened
and aligned perfectly with a replacement fender.
At the same time that I was selling
off the stuff I didn't want, I was buying stuff I did. I bought
second-hand parts and accessories when possible and splurged for
new parts when necessary. Buying and selling activities became a
part of my daily routine--checking Ebay and the forums, looking
through the mail for money orders, scrounging boxes, packaging shipments,
and going to the post office. I finally ran out of parts to sell
and, with only a few things needed to finish the project, I went
into a sort of withdrawal.
New Clothes
I looked for a painter while the buying and selling was in high
gear. I inquired at local paint and body shops, but never got a
warm fuzzy about any of them. The local shops seemed to be unjustifiably
expensive, so I turned my search to out-of-town sources. I finally
settled on Andrew Preston, the painting expert at Bushtec Trailers
in Jacksboro, Tennessee.
A few years earlier, Yamaha had contracted
with Andrew to custom paint 85 Royal Stars in an ivory pearl color
for the one-time offering of the "Palomino" model. I figured
if he was good enough for Yamaha, he was good enough for me.
Jacksboro is a long way from Houston,
but between email and snail mail, we finally agreed on a cream pearl
color with gold leaf and tan striping. I wanted something elegant
and simple. To enhance the retro look of the Royal Star, Andrew
painted the chrome buckets on the headlight and passing lamps along
with the fork covers and radiator side covers. While most riders
chrome the forks, I wanted more paint.
Chrome Is Good, Too
Because I like to ride every day, I didn't want to take down the
bike for a couple of weeks while parts were shipped out on a chrome
exchange program. I bought new and used parts, knowing I would later
get a refund when the original was returned to the vendor. I disassembled
and polished the switch housings myself, and both master cylinders
were exchanged for polished versions. Nothing was chromed. I like
the contrast of different finishes, such as chrome against brushed
aluminum, and so forth.
That's not to say chrome goodies were
sparse--quite the contrary! The list of plated accessories is long
and includes items such as covers for the front rotors and calipers,
backing plates for the passenger pegs, and replacements for virtually
all exposed bolts.
Exhausting Work
The exhaust pipes needed some attention, too. The Royal is a V-4,
and there are four exhaust pipes. The lower pipe on each side was
damaged, but the uppers were not. I really didn't want to buy a
whole set of four when I only needed two replacements. I called
Tom in the customer service and tech support department of Baron's
Custom Accessories to see if he could help.
The pipes on the bike were from Baron's
and had been installed along with a jet kit a year prior. Early
in 2001, Yamaha announced the discontinuance of the Royal Star and,
like other aftermarket suppliers, Baron's began reducing their inventory
of accessories for this fine bike. Tom said that they were no longer
making pipes for the Royal Star, but he might be able to scrounge
a set of lowers at an attractive price. Sure enough, he came through.
Pull Up a Seat
The bike was fitted with a Corbin Dual Tour saddle when I bought
it, but I've never cared for the looks of a single two-up seat.
I sold the seat, backrest pad, and driver backrest as a set and
replaced them with OEM seating from a 1998 Royal Star Tour Deluxe.
I added a driver backrest from Utopia that matched the design of
the Yamaha seating.
I feel that studded leather accessories
take away attention from chrome bits here and there, so the seats
and saddlebags are unadorned.
Most of the time, I ride solo with
a fender rack in place of a passenger seat, but a two-up configuration
takes less than fifteen minutes to complete.
The Work Weekend
No doubt you've heard the expression, "Measure twice and cut
once." Well, that's how I felt in early September. I reviewed
the shop manual several more times,and got an early start on Saturday
morning. By the end of the day, everything had been removed except
the engine, transmission, and wheels. Each part that came off dispelled
a bit more of the mystery surrounding how the bike was put together.
Anything is easy when you know how, and by the time Jake was down
to the frame and power train, I had a much better understanding
of the bike's underpinnings.
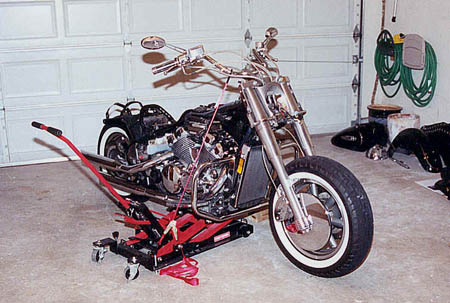
"Jake" Naked
The wiring harness running through the rear fender was as simple
to understand as the sub-frame supporting the fender itself. The
mounts and components of the tank were logical and straightforward
to transfer from the damaged fuel tank to the new one. My greatest
fear was disassembling the forks--the steering system!--but even
the forks and clamps seemed logical as one component after another
came off.
It was early evening before everything
had been removed that needed to be, and I quit for the day with
a feeling of confidence that comes from knowing you can to do the
job right. I just knew everything would turn out well.
The reassembly process went smoothly
but took longer than the disassembly because every part was cleaned
and polished before it was bolted on. So it was midday on Monday
before the reconstruction was finished.
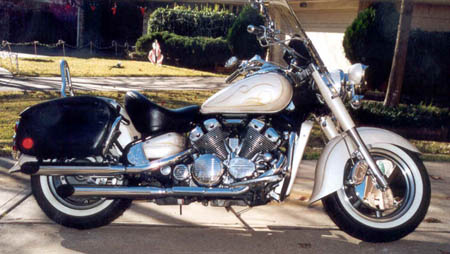
"Jake" Becomes "Jackie"
Going Down the Road
I still may not be willing to adjust the valves, but now I'm ready
to dig deeper than I would have ever thought into my scoot's inner
workings. Learning to balance the carburetors is the next thing
on my list.
I sit a bit closer to the tank these
days because of the new saddle, and I'm more aware of little sounds
than I was before. The paintwork gets admiring looks from other
riders, which is at least part of the reason for doing it. The bike
doesn't feel different since the rebuild, and it doesn't handle
any differently; but that's sort of the point, isn't it? To me it
means I've put Jake back together correctly, and I learned a lot
about how to make future repairs and modifications.
There's something else, too: the self-satisfaction
that comes from doing a tough job well, and the knowledge that you
can do it again. The regard my fellow riders have for me has edged
up a bit, too, and my smile is a bit wider knowing I'm more personally
responsible for how well we travel together.
One thing did change: The cream pearl
paint and gold striping convinced me that "Jake" had morphed
into "Jackie."
|